Effective Ways to Fix Joy-Con Drift in 2025: Discover Proven Solutions!
The Joy-Con drift problem is a widely known issue among Nintendo Switch users, leading to frustrations during gameplay. **Joy-Con drift fix** has become a trending topic, and numerous **joy con drift solutions** have emerged to tackle this common challenge. This article aims to provide you with comprehensive information on how to resolve **joy con joystick issues**, ensuring your gaming experience remains uninterrupted. Whether you’re looking for DIY methods or wish to learn about professional services, we’ve got you covered. Let’s delve into practical, actionable steps for fixing your **joy con drift**.
Understanding Joy-Con Drift Symptoms
Recognizing the **joy con drift symptoms** is crucial for addressing this problem. Common indications of **drift problem joy con** include the joystick registering movement even when it is not being touched, causing your character or on-screen element to sporadically navigate without input. This is often referred to as ‘ghost movement’. Players may notice that their **joy con drift controller** doesn’t respond accurately which can lead to high frustration, especially in competitive or rhythm games. Additionally, frequent disconnects or unusual latency might hint at underlying issues. Conducting a **joy con drift test** through calibration can help clarify the extent of the issue, allowing you to decide on the best **joy con repair** methods.
Identifying the Cause of Joy-Con Drift
Understanding the potential causes of **joy con drift** can be beneficial in preventing future issues. Dust and debris accumulation inside the joystick mechanism can significantly hinder performance. Sometimes, it’s merely a result of excessive wear and tear, especially if you use your controllers frequently for competitive gaming. By examining your **joy con maintenance** habits, you can mitigate risks. Moreover, factors like static build-up or poor calibration settings could also lead to degraded performance. Regular maintenance, such as cleaning and recalibrating your **joy con**, can greatly improve lifespan. Therefore, understanding these factors helps in diagnosing the problem and opting for the right **joy con drift solutions**.
Available Fixes Before Considering Repairs
In some instances, simple remedies may fix the **joy con joystick issue** without requiring replacement or complex repairs. Begin by performing a **joy con reset**; this often restores optimal performance and resolves connectivity issues. Another method is to recalibrate your joystick using the built-in features of the Switch console. Access the system settings, navigate to controllers, and follow the steps for **joy con calibration**. Additionally, thorough cleaning should not be overlooked. Use isopropyl alcohol and a soft cloth to clean around the joystick area, helping to remove grime that may contribute to drift. Keeping your consoles updated to the latest firmware version might also help in addressing new underlying issues that affect **joy con response**.
The Process of Joy-Con Cleaning
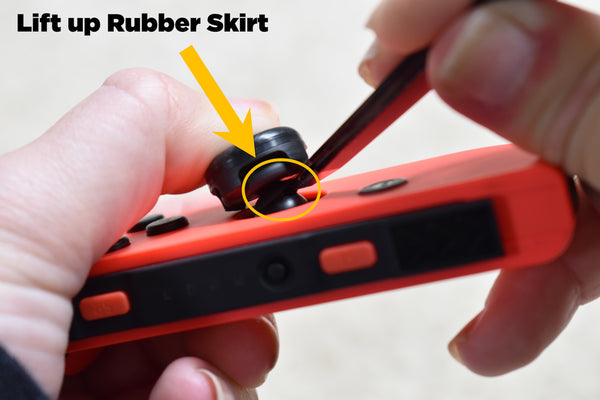
**Joy con cleaning** can significantly alleviate many **joy con drift** issues. Over time, debris can build up around the joystick, leading to improper functioning. Begin the cleaning process by placing a small amount of isopropyl alcohol on a microfiber cloth, then gently wipe around the joystick. Be cautious not to soak the mechanism; it’s essential to allow sufficient drying time afterward. Moreover, utilizing compressed air to blow out any dust trapped inside can further enhance the cleaning process. More invasive cleaning involves disassembling the Joy-Con, which is recommended only for those comfortable with DIY repairs, but can yield the best results for persistent **joy con drift controller issues**. Following a thorough cleaning, perform a **joy con calibration** to ensure accurate response again.
DIY Repair Methods: Advanced Approaches
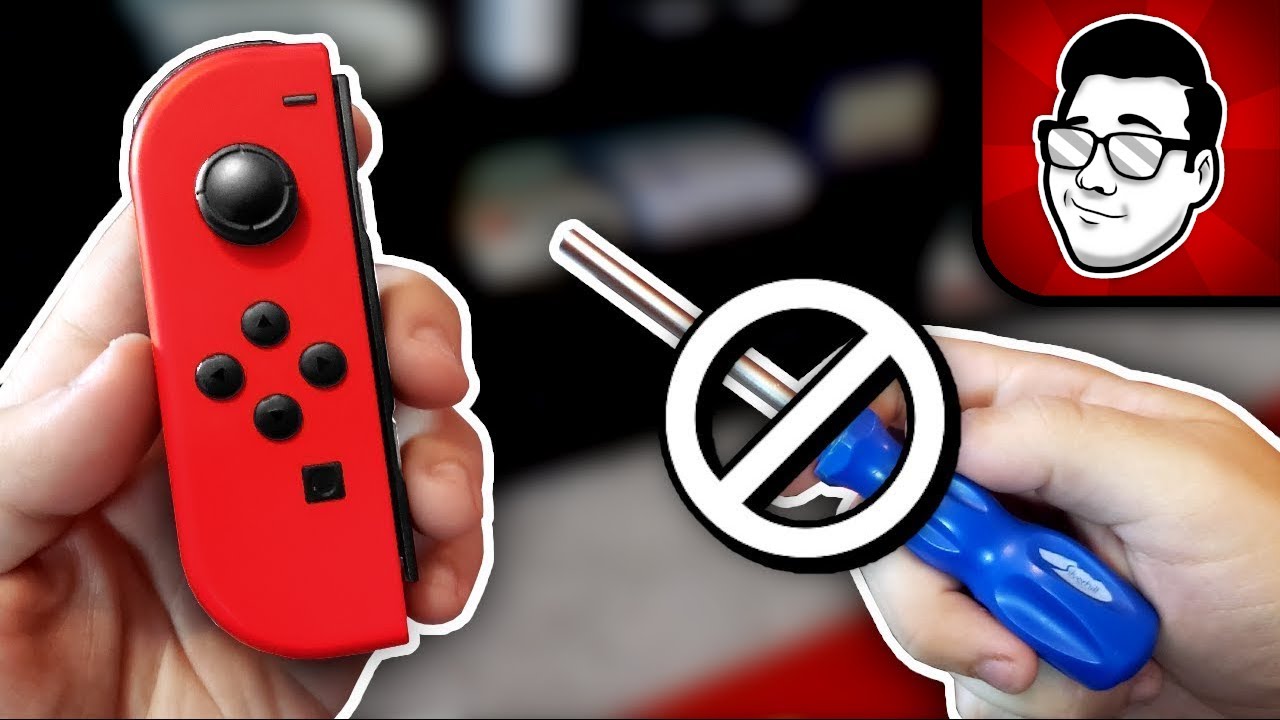
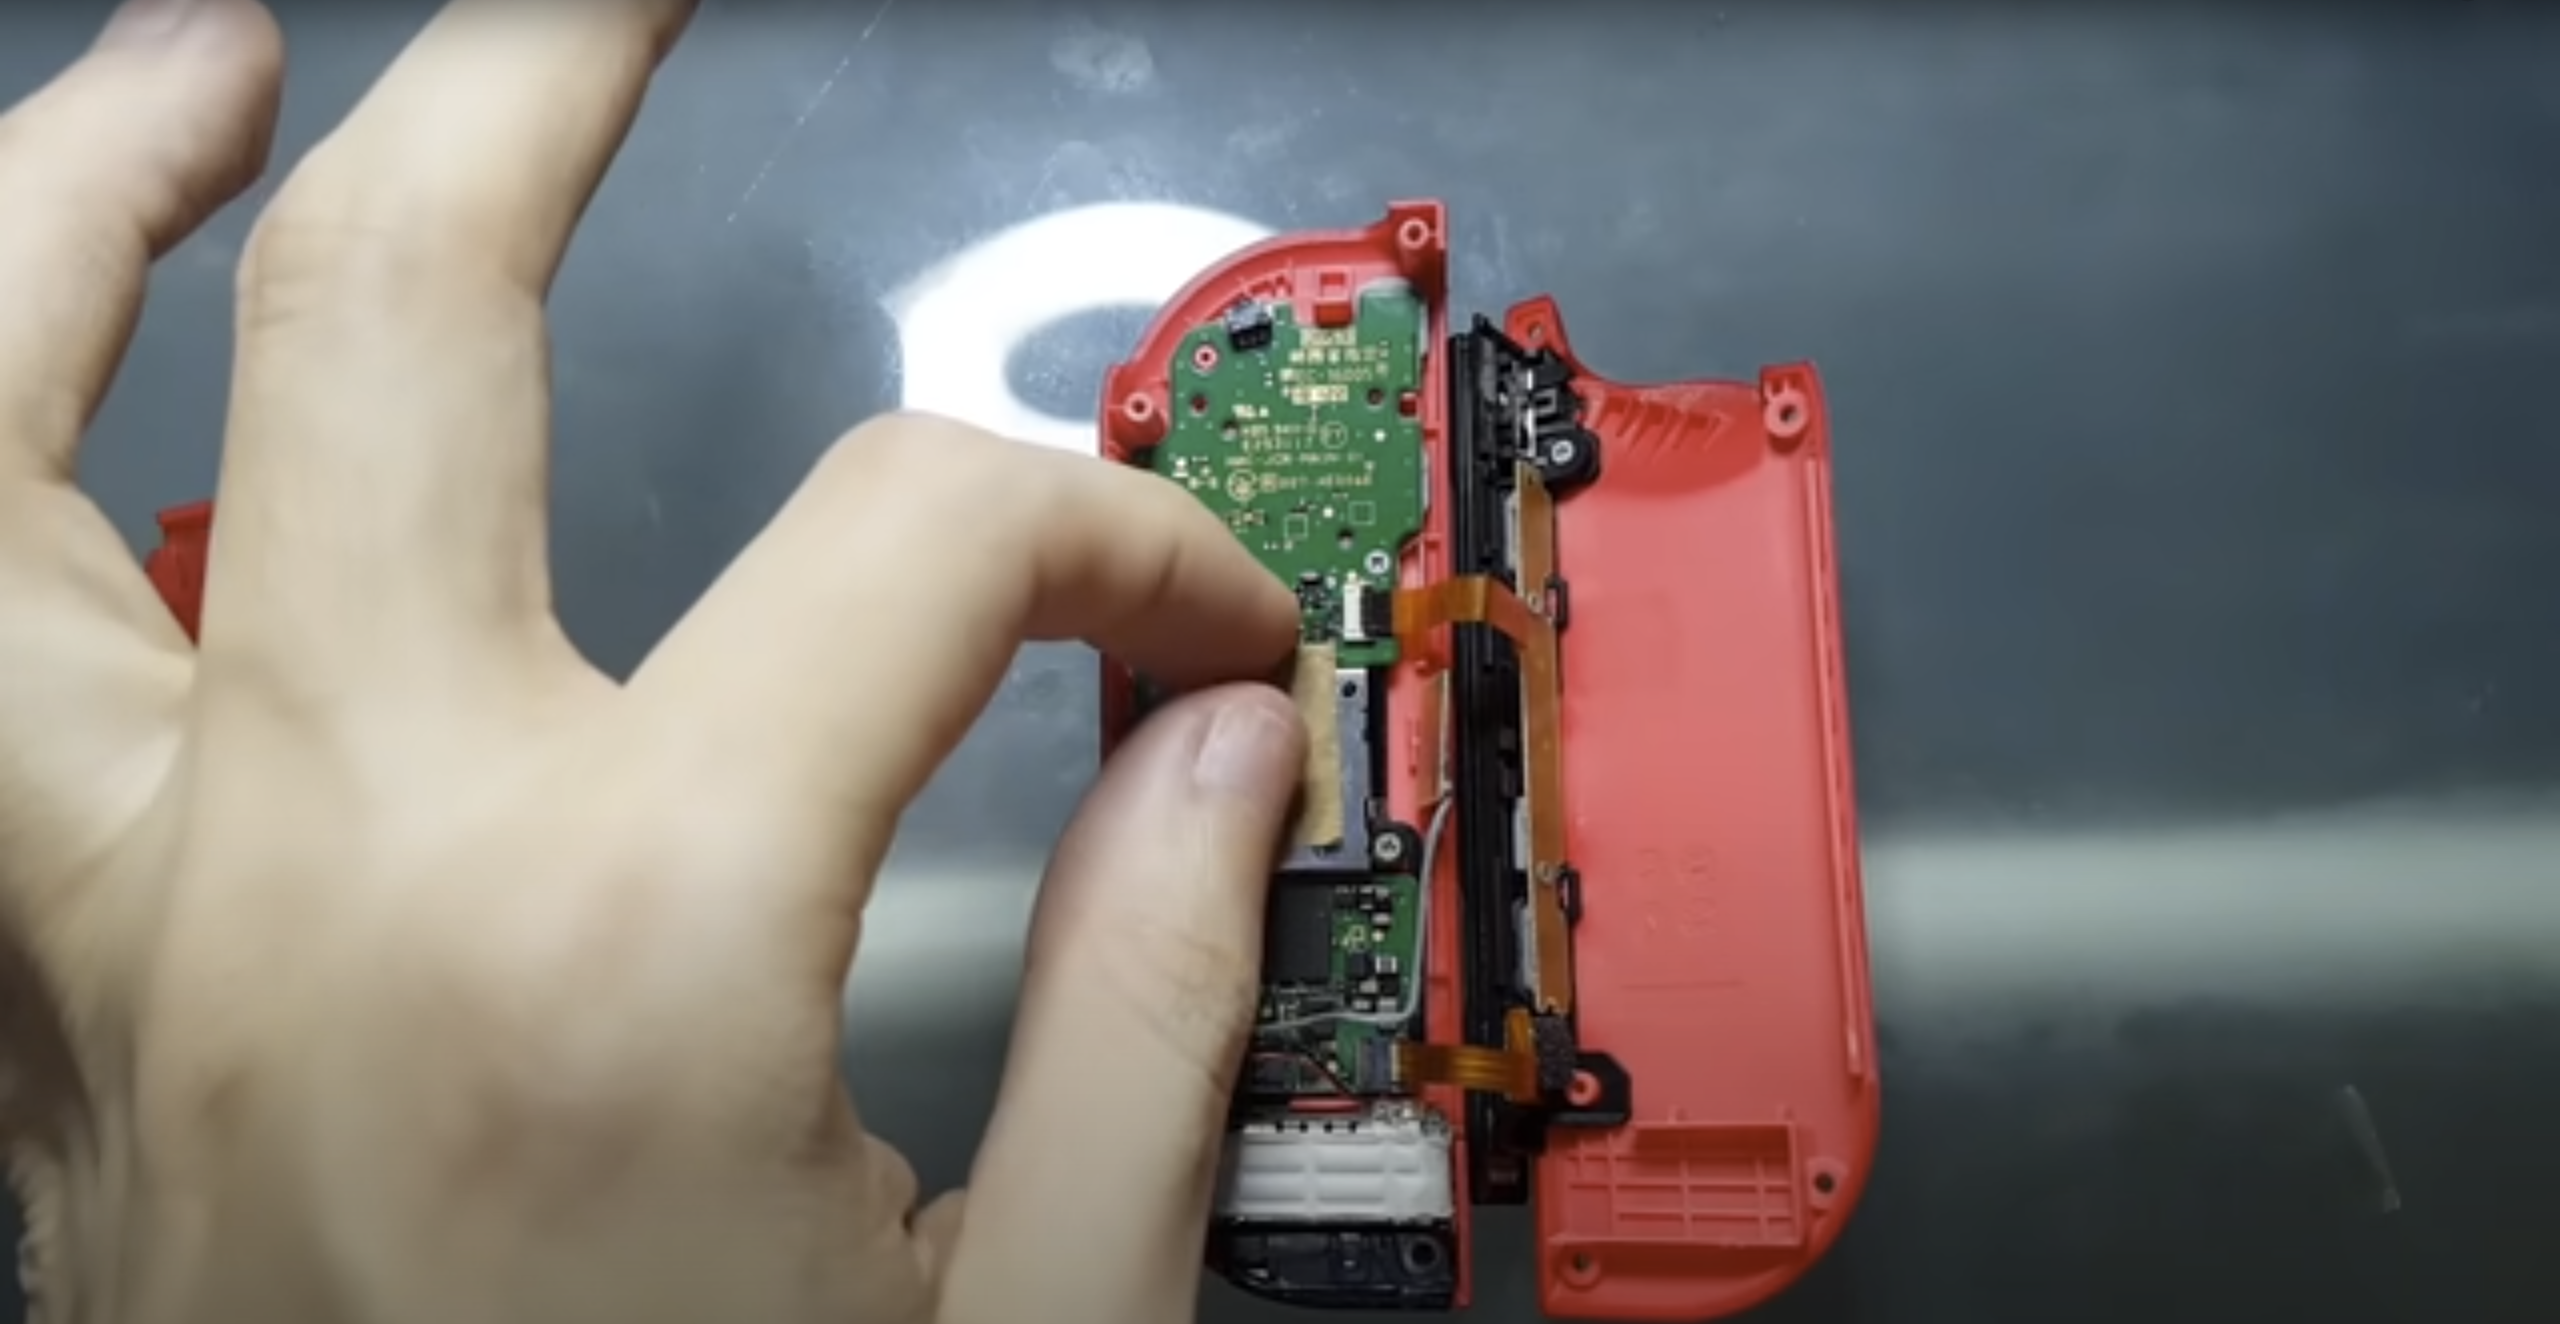
If basic cleaning and calibration do not resolve your **joy con drift issue**, applicable DIY repair methods can be employed. One effective fix involves replacing internal joystick components if they’re found defective. You can purchase **joy con replacement parts** online to facilitate this repair. Using tools like screwdrivers and tweezers specifically designed for electronics will help you access the internal mechanisms responsibly. When handling parts, ensure proper anti-static precautions are taken to prevent damage. Moreover, following a reliable **joy con repair guide**, you can systematically navigate through the disassembly and reassembly processes, granting you the opportunity to thoroughly assess and potentially fix any underlying hardware issues.
Seeking Professional Help for Repairs
If you’re uncomfortable with DIY approaches, turning to professional services for **joy con repair** can be a prudent decision. Many repair shops specialize in modern gaming equipment, providing reliable options for fixing **joy con drift errors**. Professional repair services might also validate whether warranty claims can cover your repairs if the drift issue is persistent. Moreover, examining customer reviews of repair services can help you gauge the quality and effectiveness of their work. Opting for a **joy con repair service** saves time and often guarantees a warranty on the repair performed, promising peace of mind.
Preventing Joy-Con Drift in the Future
Ensuring the longevity and proper functionality of your Joy-Con controllers is vital. Implementing simple **joy con maintenance tips** can go a long way. Regularly clean your Joy-Con controllers to fend off dust buildup. Keeping them stored in a clean environment will also help in maintaining their condition. Consider investing in **joy con drift prevention** accessories, such as joystick covers that can safeguard against dirt infiltration. Moreover, be cautious about overusing the analog sticks in games, as excessive force can lead to premature wear. By adopting these measures, you can significantly reduce the likelihood of encountering drift problems again.
Testing Your Joy-Con After Maintenance
Once you’ve performed maintenance or completed a **joy con drift repair**, it’s crucial to conduct a thorough functionality test. Utilize the console’s built-in options to run a **joy con drift test**, which will check joystick performance and determine if there are lingering issues. Engage several games focusing on actions that require precision to see if the **joy con joystick functions** properly. Additionally, consistently monitor for drift during gameplay to ensure that all is well. This vigilance allows you to catch potential problems early, preventing them from snowballing into significant issues that may require extensive repairs.
Utilizing Calibration Tools for Better Performance
By obtaining joy con calibration tools, you elevate the precision of your Joy-Con controllers substantially. These can aid in recalibrating the joystick after repairs or maintenance efforts. third-party software and apps provide visual tools that help you assess stick position under various conditions. Regularly recalibrating can also ensure that future drifts are minimized, restoring optimal control. Thus, understanding the calibration process helps both casual and competitive gamers maintain their desired joystick responsiveness.
Key Takeaways
- Identify symptoms of joy con drift to understand the necessary immediate action.
- Cleaning your Joy-Con regularly can prevent significant drift problems.
- Utilize DIY tools for repairs or consider professional help if needed.
- Employ maintenance methods to prolong the life of your Joy-Con controllers.
- Regularly perform checks after any cleaning or repairs to ensure functionality.
FAQ
1. What are the most common joy con drift symptoms?
The most prevalent symptoms include unexpected movements of the cursor or character without any player input, also referred to as ghosting or drifting. Other signs may involve difficulty in registering inputs or inconsistent joystick response across different games.
2. How can I effectively clean my Joy-Con controllers?
To clean your Joy-Con controllers, use a microfiber cloth slightly moistened with isopropyl alcohol. Gently wipe around the joystick area. For more thorough cleaning, you may need to disassemble your controllers and clean the internal mechanisms, ensuring caution to avoid static damage.
3. Should I consider DIY repairs for Joy-Con drift?
If you are technically inclined and comfortable disassembling electronics, DIY repairs can be a cost-effective approach. However, ensure you have the right tools and replacement parts before attempting any repairs. Consider watching video tutorials or reading comprehensive guides to aid the process.
4. What tools do I need for a DIY joy con repair?
Key tools for a Joy-Con repair include precision screwdrivers, plastic prying tools, tweezers, and some isopropyl alcohol for cleaning components. Moreover, sourcing quality replacement parts from reliable suppliers ensures the durability of the repair.
5. What’s the best way to prevent joy con drift reoccurring?
Preventing joy con drift involves regular cleaning of the controllers, proper storage, and advocating light joystick use during gameplay. Implementing these maintenance techniques will significantly reduce the chances of future drift issues.